
I have taken a IR receiver and pushed the results to a LCD screen. I also show unknown buttons from a different remote on the serial monitor. This will come in handy as I get deeper into larger projects and want a remote to control them.
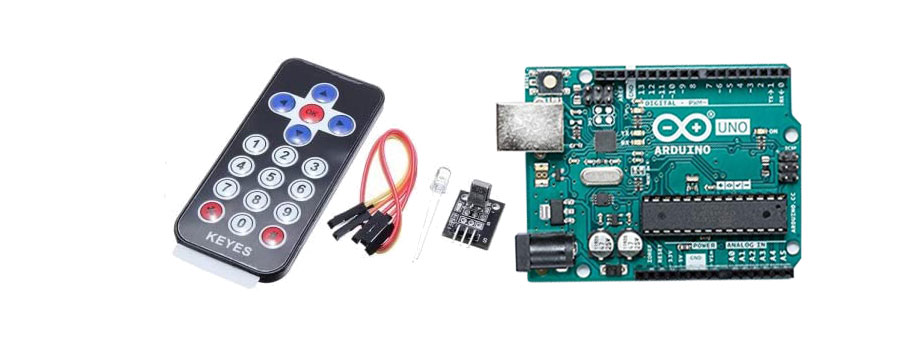
| Parts Needed |
The case statement is the part of the code that tells what to do when a button is pressed. The reason to display the code to the serial monitor was to find out the code that is being sent for each button. So I would push the button, find the code and then add it to the case list and have it display the button pushed. The code can be expanded to do many different things when the button gets pushed.
#include <LiquidCrystal.h>
#include "IRremote.h"

int receiver = 3; // Signal Pin of IR receiver to Arduino Digital Pin 11

/*-----( Declare objects )-----*/
IRrecv irrecv(receiver);           // create instance of 'irrecv'
decode_results results;            // create instance of 'decode_results'

LiquidCrystal lcd(7, 8, 9, 10, 11 , 12);

void setup() {
  Serial.begin(9600);
  Serial.println("IR Receiver Button Decode");

  irrecv.enableIRIn(); // Start the receiver

  lcd.begin(16, 2); //this tells the lcd include that you have a 16x2

}

void loop() {
    lcd.setCursor(0,0);//moves to row 1 at character 7
    if (irrecv.decode(&results)) // have we received an IR signal?

  {
    translateIR();
    irrecv.resume(); // receive the next value
  }

  }


  /*-----( Function )-----*/
void translateIR() // takes action based on IR code received

// describing Remote IR codes

{
  Serial.println(results.value);
  switch(results.value)

  {
  case 16753245: Serial.println(" ch-");lcd.clear(); lcd.print(" ch-"); break;
  case 16736925: Serial.println(" ch");lcd.clear(); lcd.print(" ch"); break;
  case 16769565: Serial.println(" ch+");lcd.clear(); lcd.print(" ch+"); break;
  case 16748655: Serial.println(" eq"); lcd.clear();lcd.print(" eq"); break;
  case 16761405: Serial.println(" Play/Pause");lcd.clear(); lcd.print(" Play/Pause"); break;
  case 16712445: Serial.println(" Next");lcd.clear(); lcd.print(" Next");   break;
  case 16720605: Serial.println(" Prev");lcd.clear(); lcd.print(" Prev");   break;
  case 16754775: Serial.println(" +");lcd.clear(); lcd.print(" +");  break;
  case 16769055: Serial.println(" -");lcd.clear();lcd.print(" -"); break;
  case 16724175: Serial.println(" 1"); lcd.clear();lcd.print(" 1");   break;
  case 16718055: Serial.println(" 2");lcd.clear(); lcd.print(" 2");   break;
  case 16743045: Serial.println(" 3");lcd.clear(); lcd.print(" 3");   break;
  case 16716015: Serial.println(" 4");lcd.clear(); lcd.print(" 4");   break;
  case 16726215: Serial.println(" 5");lcd.clear(); lcd.print(" 5");   break;
  case 16734885: Serial.println(" 6");lcd.clear(); lcd.print(" 6");   break;
  case 16728765: Serial.println(" 7");lcd.clear(); lcd.print(" 7");   break;
  case 16730805: Serial.println(" 8");lcd.clear(); lcd.print(" 8");   break;
  case 16732845: Serial.println(" 9");lcd.clear(); lcd.print(" 9");   break;
  case 16738455: Serial.println(" 0");lcd.clear(); lcd.print(" 0");   break;
  case 16750695: Serial.println(" 100+"); lcd.clear();lcd.print(" 100+");   break;
  case 16756815: Serial.println(" 200+");lcd.clear(); lcd.print(" 200+");   break;
  case 255: Serial.println(" REPEAT");lcd.clear(); lcd.print(" REPEAT"); break;

  default:
   lcd.clear();
    Serial.println(" other button   ");

  }// End Case

  delay(500); // Do not get immediate repeat


} //END translateIR
You also need to download this library and install it in the Arduino app (Click Sketch-Import Library). Download file here: IR Library
